Pinpoint Whistling Air Vents in 10 Seconds: Homeowner Fix Path
Most vent whistling comes from airflow problems: high velocity at the register or a restricted return, sometimes combined with damaged ductwork. It’s usually safe to run a few quick checks yourself, like inspecting the filter and register, but shut the system down and call a professional if you smell gas, see soot, or notice a rhythmic banging sound from the ducts.
TL;DR:
- Most whistling vents result from airflow issues caused by undersized or restricted ducts, damaged ductwork, or debris disrupting smooth air movement.
- Simple checks include inspecting filters, opening registers fully, and testing airflow with the fan on and off to identify if turbulence is the source.
- Fixes range from cleaning or replacing filters and sealing leaks to professional duct resizing, sealing, or replacing damaged segments for lasting quietness.
- Persistent whistling, especially with signs of duct damage or airflow loss, requires professional diagnosis involving pressure and flow testing.
- Restricting airflow to silence a whistle can worsen system pressure, so addressing the root cause is essential for effective and safe resolution.
Table of Contents
- Common mechanical and airflow causes of whistling vents
- Quick checks you can run to find the source
- Step by step fixes, from simple to professional
- When whistling means it’s time to call a professional
- Preventing whistling vents before they start
- What a professional diagnostic visit actually looks like
- What the noise is really telling you
- Get a quiet, properly balanced system
- Sources
- FAQ
Common mechanical and airflow causes of whistling vents
Whistling is a symptom of air moving faster than it should through a small opening. When a register is undersized for the airflow passing through it, the air speeds up and creates an aerodynamic whistle, the same principle that makes a reed instrument produce a tone. ACCA warns that airflow-related noise in residential systems is not normal and usually points to a design or installation problem rather than something to live with.
A few specific faults show up again and again:
- A restricted or undersized return duct forces the blower to work harder, raising static pressure throughout the system.
- Crushed, kinked, or loose flexible ducts create turbulence that produces tonal or fluttering noises.
- Missing dampers, dropped screws, or debris inside a register disrupt smooth airflow.
- Dirty filters or a blower running at an unexpectedly high speed push more air through the same small openings.
- Oil-canning, where sheet metal ducts flex and pop under pressure, often signals a return-side problem rather than a supply-side one.
Undersized return ducts are common in residential systems, with industry estimates suggesting the issue affects the majority of homes, which is why fixing a noisy register alone often does not solve the problem. If the return path is choked, the whole system runs under more pressure than it was designed for.
Quick checks you can run to find the source
Before touching anything, figure out whether the noisy vent is a supply or a return. Supply vents blow air out and usually sit high on walls or in ceilings; returns pull air in and are often larger, with a visible filter behind the grille. Our guide to identifying supply versus return vents walks through the hand test in more detail.
- Hold your hand near the vent: air pushing out means supply, air pulling in means return.
- Remove the register cover and listen again with it off to see if the noise gets louder or changes pitch.
- Turn the system fan on and off to confirm the whistle tracks with airflow rather than the compressor or burner.
- Check the filter for dirt or a very tight fit and replace it if it looks clogged.
- Hold a lit incense stick or smoke pencil near suspected leak points to watch how the smoke reacts.
- Close the door of a room with a supply vent but no return, then check if the door struggles to open, which signals a pressure imbalance.
Pro Tip: Do the fan on/off test first. It takes ten seconds and immediately tells you whether the noise is airflow-related or something mechanical inside the equipment.
Step by step fixes, from simple to professional
Start with the fixes that cost nothing and take a few minutes. Clean or replace a dirty filter, make sure registers are fully open and free of debris, tighten any loose screws on the grille, and reorient the louvers to change how air exits the opening. These small adjustments solve a surprising share of whistling complaints on their own.
If the noise persists, move to intermediate fixes:
- Re-secure or straighten flexible ducts that have sagged, kinked, or come loose from their connections.
- Seal visible leaks at duct joints with mastic sealant or foil tape rather than standard cloth duct tape, which degrades over time.
- Adjust dampers gradually and recheck airflow in nearby rooms, since closing one damper too far can push a whistle problem elsewhere.
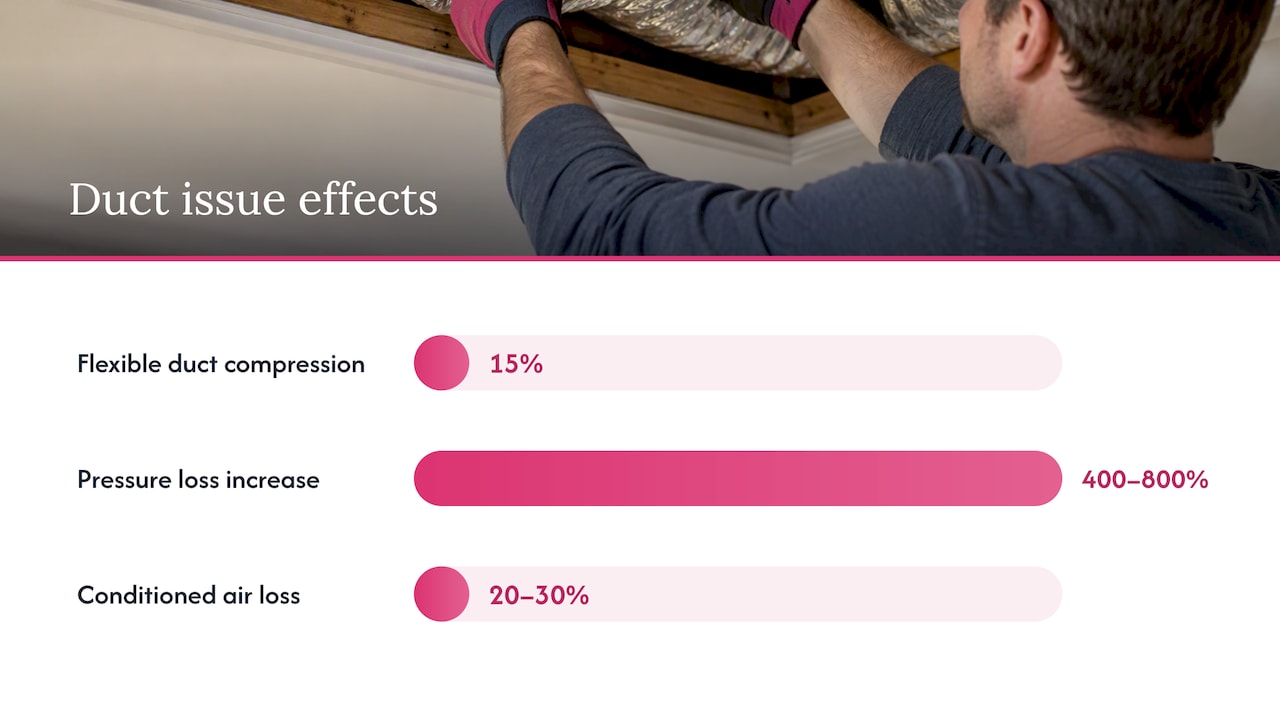
Duct retrofit guidance from the Building Science Educational Series notes that even a 15 percent compression in a flexible duct can cause a 400 to 800 percent increase in pressure loss, which explains why a duct that looks only slightly flattened can produce a noticeable whistle. The same guidance points out that homes can lose 20 to 30 percent of conditioned air to leaks, a loss that shows up as both noise and higher utility bills.
Upgrades often stop aerodynamic noise for good. Swapping an undersized register for a correctly sized one, or moving to a diffuser with a lower noise criteria rating, reduces velocity and therefore the turbulence that generates whistling tones. Beyond that point, the work shifts to a professional: resizing an undersized return trunk, pressure testing and sealing the full duct system, replacing damaged segments, or tuning static pressure across the whole system.
When whistling means it’s time to call a professional
Some signs mean you should stop troubleshooting and book a service call. Persistent whistling that continues after you’ve checked the filter, register, and visible ducts usually points to a problem inside the wall or attic that you can’t reach safely.
Watch for these red flags:
- Whistling that gets louder or changes character after your basic fixes.
- Visible oil-canning, rhythmic popping, or dented and disconnected duct sections.
- Noticeable airflow loss in several rooms at once, or doors that slam or stick from pressure changes.
- Any change in how a gas furnace or water heater drafts, a gas smell, or soot near a vent, which means you should shut the system off immediately and call for service.
A technician will typically use a flow hood to measure actual airflow at each register, a pressure-pan test to isolate leaky duct sections, and in some cases blower-door or duct-blower testing to quantify total leakage. Our page on common return air problems covers a few free checks worth trying before that call.
Preventing whistling vents before they start
A short maintenance routine keeps most of these problems from coming back. Replace filters on a regular schedule, and be cautious with very high-MERV filters, since they can raise static pressure enough to create the same whistling they were meant to prevent.
- Check filters monthly and replace them on the schedule your system calls for.
- Look for loose duct seams, sagging flexible runs, or missing insulation in attics and crawl spaces once or twice a year.
- Balance airflow or add a return if one room consistently feels pressurized or starved for air.
- Schedule an annual tune-up so a technician can catch small leaks before they turn into noise or wasted energy.
Pro Tip: Mark your filter’s replacement date on the frame with a marker so you’re not guessing whether it’s been three weeks or three months.
What a professional diagnostic visit actually looks like
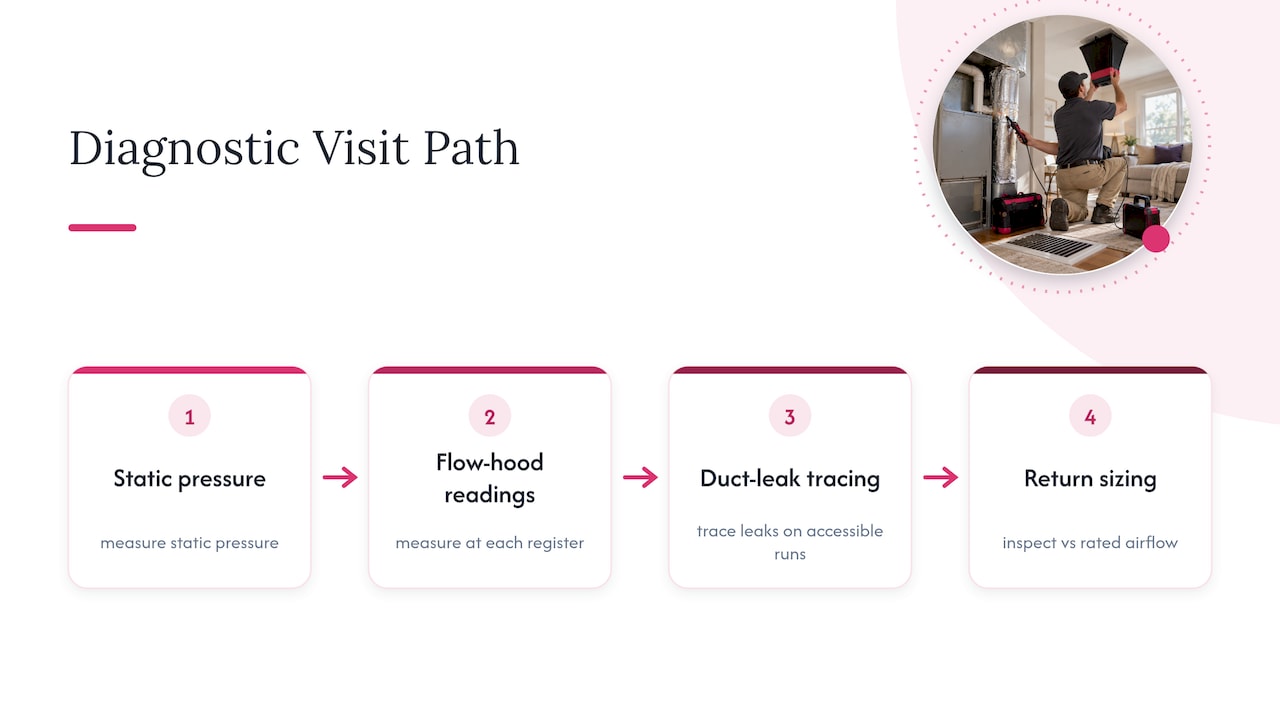
Some companies offer diagnostic visits that focus on finding the actual cause rather than selling unnecessary fixes. A typical checklist includes measuring static pressure, taking flow hood readings at each register, tracing leaks along accessible duct runs, and inspecting return sizing against the system’s rated airflow. Most diagnostic visits identify the source of a whistle within one visit, with repair scope determined by what the pressure and airflow readings show.
What the noise is really telling you
The instinct to mute a whistling vent with a nearly-closed damper or a smaller register is understandable, and it’s also usually the wrong move. Restricting airflow to reduce noise can raise static pressure and make existing duct leakage worse, trading a sound problem for an efficiency and comfort problem you can’t hear as easily.
The more useful frame is that whistling is diagnostic information, not just an annoyance. It’s telling you something about velocity, pressure, or a physical fault in the duct system, and the fix that actually lasts is the one that addresses which of those three it is. Homeowners who chase the loudest register first, rather than checking the return side, often spend money twice. Start cheap and reversible: filter, register, screws. If the noise survives that, the return side and duct condition deserve more attention than the vent itself.
Get a quiet, properly balanced system
If your own checks haven’t quieted things down, that usually means the fix lives inside the ductwork rather than at the register. Tru Comfort handles duct sealing, return resizing, and full duct installation and repair for homes where the airflow problem goes beyond a filter swap.

A service visit starts with the same diagnostics described above: static pressure, flow hood readings, and a walkthrough of your duct condition, followed by a straightforward quote before any work begins. For ongoing peace of mind, the Tru Comfort Advantage maintenance plans catch small duct and airflow issues before they turn into whistling or worse. If the noise showed up alongside weak airflow or a furnace that seems to be struggling, our furnace repair services page is the place to start, and same-day service is available if the problem feels urgent.
Sources
For deeper technical detail, ASHRAE’s guidance on duct design explains how velocity drives noise, while ACCA’s Manual D sets the sizing standards technicians use to avoid it.
- Hey Ed, should there be noise when it comes to airflow? – ACCA HVAC Blog
- Duct retrofit decision guide (CEE / Building Science Educational Series)
- Strategy to reduce return noise — Air distribution basics (Building America / DOE)
FAQ
How do I stop my air vent from whistling?
Start by cleaning or replacing the filter, making sure the register is fully open, and tightening any loose screws on the grille. If the whistle continues, the cause is likely a duct or return-side airflow issue that needs a flow hood or pressure test to pin down.
Is whistling noise a serious problem?
On its own, whistling is usually a sign of airflow imbalance rather than immediate danger. It’s worth taking seriously because unaddressed airflow problems are considered abnormal by industry guidance and can waste energy or strain your blower motor over time, but a gas smell or soot near a vent is the exception that means stop and call a professional immediately.
Why is my vent making a high pitched noise?
A high-pitched tone almost always means air is moving too fast through too small an opening, whether that’s an undersized register or a closed damper. Reducing velocity, often by resizing the register or duct, is the standard fix for this kind of aerodynamic whistle.
Why is my HVAC making a whistling sound?
The whistling usually originates at a register or return grille rather than inside the equipment itself, caused by high air velocity, a restricted return, or a damaged duct section. Running the fan on and off helps confirm the noise tracks with airflow, which points you toward the duct system instead of the compressor or burner.